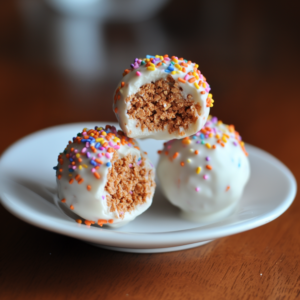
Irresistible Easy Butterfinger Balls for Snacking
Craving a homemade candy that’s easy to make? Easy Butterfinger balls are the perfect no-bake treats. They capture the crunch and flavor of Butterfinger bars, making them a fun snack.
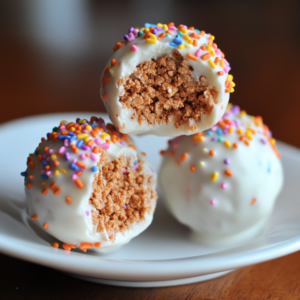
Imagine making a dessert that’s easy but tastes amazing. These candy balls mix Butterfinger’s crispy taste with smooth chocolate. They’re great for parties, gifts, or a quick sweet treat.
Whether you’re new to baking or a pro, these Butterfinger balls are a hit. They need just a few ingredients and no oven. You’ll make these tasty treats quickly.
The Magic Behind Easy Butterfinger Balls
Candy lovers have always been drawn to Butterfinger’s unique crunch and taste. Introduced in 1923 by the Curtiss Candy Company in Chicago, it quickly became a favorite. It has captured the hearts of many across the United States.
Butterfinger’s Sweet Journey
The classic Butterfinger candy has a rich history. It was created during America’s golden age of candy making. This candy is more than just a sweet treat. It’s a nostalgic experience that brings generations together with its crispy, peanut buttery layers.
Why Homemade Treats Shine
- Complete control over ingredients
- Fresh, preservative-free preparation
- Customizable flavor profiles
- Cost-effective alternative to store-bought candies
Unique Recipe Features That Make These Balls Special
The Easy Butterfinger Balls recipe turns the classic candy into a homemade delight. Unique recipe features include simplicity, few ingredients, and a quick process. Making this beloved candy at home opens up a world of culinary fun and enjoyment.
Homemade candies aren’t just about taste—they’re about creating memories and sharing joy with loved ones.
Whether you love candy or want to impress at home, these Butterfinger Balls are a tasty journey into homemade sweets.
Essential Ingredients for Perfect Results
Making delicious Butterfinger balls starts with the right ingredients. You need simple yet powerful parts to make an amazing treat.
Your main ingredients are:
- Crushed Butterfinger candy bars
- Cream cheese (room temperature)
- Chocolate coating
- Powdered sugar
The cream cheese is the glue that holds everything together. It makes the mix smooth and creamy. Using full-fat cream cheese gives the best taste and texture.
“The secret to perfect Butterfinger balls is using high-quality ingredients and precise measurements.”
Choose top-notch chocolate chips or melting wafers for coating. You can use dark, milk, or white chocolate. Bakers say chocolate with at least 60% cocoa is the best.
- Pro tip: Make sure all ingredients are at room temperature for easy mixing
- Quality matters: Fresh cream cheese really makes a difference
The mix of crunchy Butterfinger, creamy cheese, and rich chocolate is irresistible. It will wow your family and friends.
Kitchen Tools and Equipment Needed
Making Butterfinger Balls is easy, even without a fancy kitchen. You likely have most of the tools you need at home. Just a few simple pieces of candy-making equipment will get you started.
Basic Requirements
First, collect these basic kitchen tools:
- Medium-sized mixing bowl
- Measuring cups and spoons
- Baking sheet or flat serving platter
- Parchment paper or silicone mat
- Wooden spoon or spatula
Optional Helper Tools
These tools are nice to have but not necessary:
- Cookie scoop for uniform ball sizing
- Electric mixer for easier blending
- Cooling rack
- Kitchen gloves for clean hands
Substitution Options
Missing some tools? No problem. You can get creative:
- No cookie scoop? Use two spoons or your hands
- Replace electric mixer with manual whisking
- Wax paper works as parchment paper substitute
- Regular plate can replace baking sheet
Butterfinger Balls are simple to make. With just a few basic tools, you can whip up a tasty treat at home.
Step-by-Step Preparation Guide
Making delicious Butterfinger balls is easy and fun. This guide will show you how to make these tasty treats step by step. You’ll learn simple techniques that anyone can do.
- Crush the Butterfinger BarsBegin by putting Butterfinger candy bars in a sealed plastic bag. Use a rolling pin to crush them into fine crumbs. This makes sure the texture is even and smooth.
- Prepare the Cream Cheese MixtureIn a big mixing bowl, soften the cream cheese at room temperature. Blend it until it’s smooth. Then, add the crushed Butterfinger crumbs slowly. Mix until everything is well combined.
- Shape the BallsUse your hands to roll the mixture into small, uniform balls. Place them on a parchment-lined baking sheet. Try to make them about one inch in diameter for the best size.
- Chocolate CoatingMelt chocolate chips in a microwave-safe bowl. Stir every 30 seconds to avoid burning. Dip each Butterfinger ball into the melted chocolate, making sure they’re fully covered.
- Chill and SetPut the chocolate-covered balls in the fridge for about 15-20 minutes. This lets the chocolate harden and gives them a glossy finish.
Pro tip: Keep your hands a bit damp when rolling the balls. This helps prevent the mixture from sticking. It makes the process smoother and more fun.
Recipe card
Craving a delightful no-bake treat? This printable Butterfinger ball recipe is your ultimate solution for a quick and delicious dessert. Impress everyone with these simple candy balls. They require minimal effort but offer maximum flavor.
Essential Kitchen Equipment
- Medium mixing bowl
- Measuring cups and spoons
- Baking sheet
- Parchment paper
- Refrigerator space
Ingredients You’ll Need
- 1 cup crushed Butterfinger candy bars
- 4 oz cream cheese, softened
- 1 cup white chocolate melting wafers
- Optional: Sprinkles for decoration
Simple Step-by-Step Instructions
- Crush Butterfinger bars into fine crumbs
- Mix crushed candy with softened cream cheese
- Roll mixture into small 1-inch balls
- Chill balls for 15 minutes
- Melt white chocolate
- Dip chilled balls in melted chocolate
- Place on parchment-lined baking sheet
- Refrigerate until chocolate sets
This easy dessert guide makes it simple for anyone to make these treats. Enjoy your homemade Butterfinger balls!
Tips for Perfect Texture and Consistency
Making delicious Butterfinger balls needs skill and precision. Learning the right techniques can turn your candy-making into a fun experience. Here are some tips to help you make perfect Butterfinger balls with ease.
Getting the right texture for Butterfinger balls is key. Temperature control is the most important part of making them.
Temperature Considerations
When making Butterfinger balls, managing ingredient temperatures is crucial. Remember these important tips:
- Chill ingredients before mixing to keep them in shape
- Use room temperature chocolate for a smooth coat
- Avoid overheating chocolate to keep the texture right
Working with Chocolate
Chocolate coating is vital for your Butterfinger balls. Choose high-quality chocolate that’s easy to temper for a shiny, crisp finish.
- Melt chocolate slowly in a double boiler
- Stir constantly to avoid burning
- Keep the temperature between 88-90°F
Troubleshooting Common Issues
Fixing candy-making problems takes patience and smart thinking. Here are fixes for common issues:
- Crumbly texture: Adjust the moisture in your mix
- Uneven coating: Use dipping tools for better results
- Chocolate separation: Make sure your ingredients are dry before coating
Pro tip: Practice makes perfect in candy creation!
Creative Variations and Flavor Twists
Turning classic Butterfinger balls into new treats is a fun adventure. It can turn a simple dessert into a culinary journey. This journey delights your taste buds and sparks your creativity.
Try these exciting candy flavor combinations to take your desserts to the next level:
- Salted Caramel Surprise: Drizzle caramel over the Butterfinger balls and sprinkle sea salt for a gourmet twist
- Peanut Butter Chocolate Fusion: Mix in extra peanut butter chips for an intensified flavor profile
- Cookies and Cream Edition: Crush sandwich cookies and roll the balls in cookie crumbs
- Nutty Crunch Variation: Coat the balls with chopped almonds or pecans for added texture
Creative dessert ideas go beyond flavor. Here are some ways to present your Butterfinger balls:
- Create themed color coatings using colored chocolate melts
- Arrange balls on decorative skewers for a party-friendly approach
- Package individually in mini cupcake liners for elegant serving
Don’t be afraid to try new things! Each variation adds a special touch to this classic treat. It’s perfect for any occasion or personal taste.
Storage and Make-Ahead Instructions
Making delicious Butterfinger balls is just the start. Storing homemade candy right is key to keeping its great taste and texture. These treats are great for busy bakers who like to prepare ahead.
Room Temperature Storage
Butterfinger balls can be stored at room temperature safely. Just follow these steps to keep them fresh:
- Store in an airtight container
- Keep away from direct sunlight
- Maintain room temperature between 60-70°F
- Place wax paper between layers to prevent sticking
Tip: Room temperature Butterfinger balls stay fresh for 3-5 days if stored right.
Refrigeration Guidelines
Refrigeration can make your candy last longer. Here’s how to keep it tasting great:
- Place balls in a sealed container
- Add a layer of parchment paper between candies
- Store in the coldest part of the refrigerator
- Consume within 1-2 weeks
Freezing Options
Freezing is a great way to store Butterfinger balls for a long time. Wrap each ball in plastic wrap, then put them in a freezer-safe container. They can stay good for up to 3 months.
Pro tip: Always let frozen Butterfinger balls thaw at room temperature for the best taste and texture.
Perfect Occasions for Serving
Butterfinger balls are more than just a sweet treat. They can make any event unforgettable. These homemade candies are perfect for many occasions, making them a favorite among creative hosts and thoughtful friends.
Party Planning Tips
Butterfinger balls are great for dessert parties. They’re small, simple to serve, and always wow guests. Here are some great ways to serve them:
- Birthday parties with a dessert buffet
- Holiday gatherings like Christmas and Halloween
- Potluck events where unique treats shine
- Game night snacks with a sweet twist
Gift-Giving Ideas
Butterfinger balls also make amazing homemade gifts. You can package them in creative ways to make them look even better:
- Mason jars with decorative ribbons
- Clear cellophane bags with custom labels
- Personalized gift boxes for special recipients
- Themed packaging matching the event’s style
Whether you’re hosting a party or making a heartfelt gift, Butterfinger balls are a delicious choice. They’re sure to bring joy to everyone.
Pairing Suggestions and Presentation Ideas
Making the perfect dessert is more than just tasty Butterfinger balls. Pairing them with other desserts can take your treat to new heights. The right match can turn your candy display from basic to breathtaking.
When it comes to candy presentation, looks matter a lot. Think about how the visual appeal and flavors will make your Butterfinger balls pop.
- Beverage Pairings
- Cold milk for a classic combo
- Espresso or cappuccino for a rich contrast
- Caramel latte to boost butterscotch flavors
- Serving Presentation Styles
- Elegant dessert platters with chocolate drizzle
- Individual mini dessert cups
- Decorative candy stands with height variation
For special events, try creative ways to serve Butterfinger balls. Arrange them on a tiered stand or in clear boxes with ribbons. The aim is to make them not just tasty but also a feast for the eyes.
Pro tip: Try different garnishes like crushed nuts, cocoa powder, or edible glitter to make your Butterfinger balls stand out!
Remember, presentation can turn a simple dessert into a memorable treat. Let your creativity run wild when serving these delightful treats.
Conclusion: Making Your Best Easy Butterfinger Balls
Making homemade candy with Butterfinger balls is easier than you think. This recipe lets you turn simple ingredients into a treat that will wow everyone. You’ll feel more confident in the kitchen as you learn this easy yet tasty method.
Butterfinger balls are great because they can be made for any occasion or just because you want something sweet. You can try different coatings and mix-ins to make them your own. This lets you show off your creativity in the kitchen.
Remember, the more you make, the better you’ll get. Each batch will help you improve and feel more confident in the kitchen. The key is to have fun and enjoy making these tasty treats. Your homemade Butterfinger balls will be a hit and bring happiness to everyone who tries them.
So, get your ingredients ready, think like a pastry chef, and start making these amazing Butterfinger balls. Your sweet journey begins now!