Delicious Snowball Cookies Recipe
Looking for a sweet holiday treat that’s easy to make? Snowball Cookies are perfect for all bakers. They have a soft white outside and a rich, buttery taste.
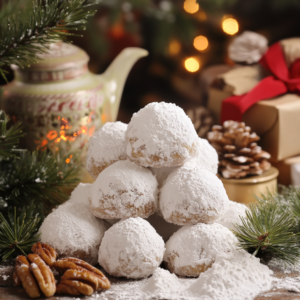
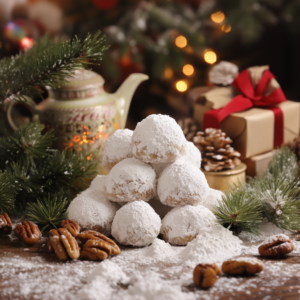
This Snowball Cookies Recipe is a holiday favorite. It turns simple ingredients into beautiful treats. With chopped nuts and a lot of powdered sugar, they look like tiny snowballs. They’re not just tasty; they’re also a festive highlight at any holiday party.
Whether you’re a pro in the kitchen or just starting out, this recipe is sure to impress. The mix of butter, nuts, and vanilla is irresistible. You’ll see why these classic Christmas treats are a holiday baking essential.
Snowball Cookies Recipe: A Holiday Classic
Snowball cookies are a beloved holiday tradition. They bring warmth and joy to family gatherings. These delicate, powdery treats have been passed down through generations. They capture the essence of festive baking with their simple yet delightful preparation.
Selecting the Best Traditional Ingredients
Creating the perfect snowball cookies starts with choosing high-quality traditional ingredients. Each component plays a crucial role in developing the cookie’s signature texture and flavor.
- Butter: Unsalted, room-temperature butter provides rich creaminess
- Powdered sugar: Creates the signature snowy coating
- Flour: Provides structure to the delicate cookies
- Chopped nuts: Pecans or walnuts add crunch and depth
- Vanilla extract: Enhances overall flavor profile
Essential Baking Tools for Perfect Cookies
Preparing snowball cookies requires minimal kitchen equipment. Most home bakers already have these baking tools on hand. This makes the recipe accessible and simple.
- Large mixing bowl
- Electric mixer or hand whisk
- Baking sheets
- Parchment paper
- Cooling rack
- Measuring cups and spoons
Cookie Storage Secrets
Proper cookie storage ensures your snowball cookies remain fresh and delicious for days. Protect these delicate treats to maintain their melt-in-your-mouth texture and festive appeal.
- Store in airtight container at room temperature
- Layer with parchment paper between cookies
- Refrigerate for up to one week
- Freeze for extended preservation (up to 3 months)
“The magic of snowball cookies lies in their simplicity and the love baked into every bite.” – Grandmother’s Kitchen Wisdom
Expert Tips for Perfect Holiday Snowballs
Making the ultimate snowball cookies is all about special baking tips. These tips can turn your holiday treats into something truly special. The secret to the perfect cookie texture is in a few simple techniques. Even if you’re new to baking, you can still get it right.
Begin by preparing your ingredients carefully. Make sure your butter and eggs are at room temperature. This makes the dough blend smoothly. Chilling the dough for at least 30 minutes before baking helps keep the cookies from spreading. It also keeps them in their classic snowball shape.
- Use finely chopped nuts for a smoother texture
- Measure ingredients precisely for consistent results
- Allow cookies to cool slightly before powdered sugar coating
The powdered sugar coating is what makes these cookies truly magical. Pro bakers suggest a two-step sugar dusting process:
- Roll warm cookies in powdered sugar immediately after baking
- Let cookies cool completely
- Roll again in fresh powdered sugar for a thick, snowy finish
When baking, keep an eye on your cookies. Overbaking can make them dry and crumbly. The perfect snowball cookie is lightly golden on the bottom. It should have a delicate, melt-in-your-mouth texture that feels like it’s dissolving with each bite.
Baking is an art of patience and precision – take your time and enjoy the process!
Recipe Card
Get ready to make the most delightful snowball cookies with this printable recipe. Our easy guide will help you through every step. This way, you’ll get delicious results every time.
Essential Equipment
-
Mixing Bowls
- At least two: one for the wet ingredients and one for the dry ingredients.
-
Electric Mixer (Hand Mixer or Stand Mixer)
- This will help you cream the butter and sugar together more easily, but you can also mix by hand if you prefer.
-
Measuring Cups and Spoons
- For accurately measuring ingredients like flour, sugar, and butter.
-
Whisk
- For whisking together the dry ingredients (flour and salt).
-
Baking Sheet
- A large, flat baking sheet to place the cookies on while they bake.
-
Parchment Paper or Silicone Baking Mat
- For lining your baking sheet to prevent the cookies from sticking.
-
Cookie Scoop or Spoon
- To portion out the dough into uniform balls. This ensures even baking and helps with consistency.
-
Cooling Rack (Optional)
- To allow the cookies to cool properly after baking. It helps them maintain their shape and prevents sogginess from trapped steam.
-
Fine Mesh Sifter (Optional)
- If you want to sift the powdered sugar for a smoother coating on the cookies.
-
Large Plate or Shallow Dish
- To roll the warm cookies in powdered sugar after baking.
Perfect Ingredients
- 1 cup (2 sticks) unsalted butter, softened
- 1/2 cup powdered sugar (plus extra for rolling)
- 1 teaspoon vanilla extract
- 2 cups all-purpose flour
- 1/4 teaspoon salt
- 1 cup finely chopped walnuts or pecans (optional)
Instructions:
-
Preheat the Oven:
Preheat your oven to 350°F (175°C) and line a baking sheet with parchment paper. -
Mix Butter and Sugar:
In a large mixing bowl, cream the softened butter and 1/2 cup powdered sugar together until light and fluffy. You can use a hand mixer or stand mixer for this step. -
Add Vanilla:
Stir in the vanilla extract. -
Combine Dry Ingredients:
In a separate bowl, whisk together the all-purpose flour and salt. Gradually add this mixture into the butter mixture, stirring until well combined. -
Add Nuts (Optional):
Fold in the chopped walnuts or pecans if you’re using them. If you prefer a nut-free version, feel free to skip this step. -
Shape the Cookies:
Using your hands, roll the dough into small balls, about 1 inch in diameter. Place the balls on the prepared baking sheet, spacing them about 1 inch apart. -
Bake the Cookies:
Bake in the preheated oven for 12-15 minutes, or until the edges of the cookies start to turn lightly golden. Keep an eye on them to avoid over-baking! -
Cool and Coat in Powdered Sugar:
Allow the cookies to cool on the baking sheet for about 5 minutes. Then, while they’re still warm, roll them in powdered sugar until completely coated. -
Final Coat:
Once the cookies have cooled completely, roll them in powdered sugar again for that perfect snowy finish. -
Enjoy!
These cookies are best enjoyed fresh but can be stored in an airtight container for up to a week.
Conclusion
Holiday baking is more than just mixing ingredients—it’s about creating lasting memories. Snowball cookies represent a cherished tradition that bridges generations. They turn simple kitchen moments into treasured family experiences.
These delightful treats offer more than just a delicious taste. They provide an opportunity for families to connect through cookie traditions. Sharing laughter and stories while rolling dough and dusting powdered sugar is part of the fun.
- Create a special holiday baking ritual with loved ones
- Transform kitchen time into bonding moments
- Share love through homemade gifts
Snowball cookies make exceptional homemade gifts that show thoughtfulness and care. Consider packaging them in festive tins or decorative boxes. This turns these simple treats into meaningful presents that warm hearts during the holiday season.
Baking is love made edible—and snowball cookies are the perfect expression of that love.
Whether you’re a seasoned baker or a kitchen novice, this recipe offers an accessible way to participate in a delightful culinary tradition. Embrace the joy of creating something special. It connects you to cherished holiday memories.
Step-by-Step Instructions
First, preheat your oven to 350°F. Cream the butter and powdered sugar until fluffy. Add vanilla and mix well. Then, gradually add flour and salt. Fold in the chopped pecans.
Roll the dough into 1-inch balls and place them on a lined baking sheet. Bake for about 12-15 minutes until the edges are lightly golden.
After baking, let the cookies cool for 5 minutes. While still warm, gently roll each cookie in powdered sugar. Once cooled, roll them again for a perfect snowy finish. This recipe makes about 24 delicious snowball cookies that will impress everyone.
FAQ
What are Snowball Cookies, and why are they so popular during the holidays?
Snowball Cookies are a classic holiday treat. They’re also known as Russian Tea Cakes or Mexican Wedding Cookies. These cookies are loved for their soft texture and buttery taste.
Their festive powdered sugar coating makes them look like snowballs. They’re easy to make, making them a hit for both new and seasoned bakers during Christmas.
Can I use different types of nuts in this recipe?
Yes, you can! While pecans or walnuts are common, you can try almonds, hazelnuts, or pistachios. Just chop the nuts finely so they mix well into the dough.
How long do Snowball Cookies stay fresh?
Snowball Cookies stay fresh for 5-7 days in an airtight container. You can also freeze them for up to 3 months. Remember to use parchment paper between layers to prevent sticking.
Why do my Snowball Cookies crack when baking?
Cracking can happen if the dough is too dry or if the cookies are overbaked. Ensure your butter is at room temperature and mix the ingredients well.
Avoid baking at too high a temperature. Chilling the dough before baking can also help prevent cracking.
Can I make these cookies ahead of time?
Yes! You can prepare the dough up to 3 days before baking. Store it in the fridge. Or, bake the cookies and store them in an airtight container for several days.
Are Snowball Cookies gluten-free?
Traditional Snowball Cookies are not gluten-free because of the all-purpose flour. But, you can make a gluten-free version by using a gluten-free flour blend. Make sure the blend is good for baking to keep the cookie’s texture right.
How do I get the perfect powdered sugar coating?
For a great powdered sugar coating, roll the warm cookies in sugar right after baking. Then, roll them again when they’ve cooled a bit. This gives them a thick, snowy coating.

Snowball Cookies
Ingredients
Equipment
Method
- Preheat the Oven:
- Preheat your oven to 350°F (175°C) and line a baking sheet with parchment paper.
- Mix Butter and Sugar:
- In a large mixing bowl, cream the softened butter and 1/2 cup powdered sugar together until light and fluffy. You can use a hand mixer or stand mixer for this step.
- Add Vanilla:
- Stir in the vanilla extract.
- Combine Dry Ingredients:
- In a separate bowl, whisk together the all-purpose flour and salt. Gradually add this mixture into the butter mixture, stirring until well combined.
- Add Nuts (Optional):
- Fold in the chopped walnuts or pecans if you’re using them. If you prefer a nut-free version, feel free to skip this step.
- Shape the Cookies:
- Using your hands, roll the dough into small balls, about 1 inch in diameter. Place the balls on the prepared baking sheet, spacing them about 1 inch apart.
- Bake the Cookies:
- Bake in the preheated oven for 12-15 minutes, or until the edges of the cookies start to turn lightly golden. Keep an eye on them to avoid over-baking!
- Cool and Coat in Powdered Sugar:
- Allow the cookies to cool on the baking sheet for about 5 minutes. Then, while they’re still warm, roll them in powdered sugar until completely coated.
- Final Coat:
- Once the cookies have cooled completely, roll them in powdered sugar again for that perfect snowy finish.