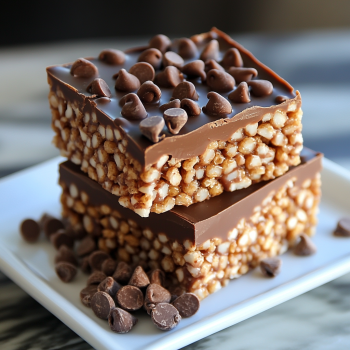
Easy Rocky Road Candy Recipe for Chocolatey Goodness
Looking for a homemade candy that’s easy and irresistible? The Rocky Road Candy Recipe is your answer! It combines rich chocolate, fluffy marshmallows, and crunchy nuts. This treat is sure to satisfy any sweet tooth.

No baking skills needed! This Rocky Road Candy Recipe turns simple ingredients into a delicious treat. It’s perfect for family gatherings or a quick sweet fix. Every bite is a burst of chocolate happiness.
Rocky Road is a beloved American treat. It’s easy to make and loved for its mix of textures. It’s a favorite in many home kitchens across the United States.
Ready to make this classic confection? It’s so easy, everyone will ask for seconds!
Essential Ingredients for Perfect Rocky Road Candy Recipe
Making the perfect Rocky Road candy starts with choosing the best ingredients. These ingredients turn your dessert into a memorable treat. The secret to this classic dessert is its mix of textures and flavors.
Choosing Quality Chocolate for Your Base
The base of any great Rocky Road candy is top-notch chocolate. Experts suggest using:
- Dark chocolate (70% cocoa) for rich intensity
- Milk chocolate for a creamy, sweet profile
- Semi-sweet chocolate for balanced flavor
Selecting the Perfect Nuts and Marshmallows
Nuts are key for Rocky Road’s crunch. Here are some great options:
- Almonds for a classic nutty texture
- Roasted peanuts for extra flavor
- Walnuts for a slightly bitter undertone
Choosing the right marshmallows is important. Size matters. Mini marshmallows spread out better, while bigger ones make soft pockets.
Creative Rocky Road Variations
Try unique add-ins to make your Rocky Road special:
- Dried cranberries for fruity tang
- Coconut flakes for tropical twist
- Pretzel pieces for unexpected crunch
- Crushed candy canes for seasonal flair
Each variation adds a special touch to this beloved classic. Your homemade Rocky Road will be unforgettable.
Kitchen Tools and Equipment Needed
Making Rocky Road candy is easy and doesn’t need fancy tools. You can make it with simple baking tools at home. This recipe is easy to follow and doesn’t cost much.
Here’s what you’ll need for Rocky Road:
- Double boiler or microwave-safe bowl for smooth chocolate melting
- Sturdy spatula for mixing ingredients
- Baking pan lined with parchment paper
- Measuring cups and spoons
Optional tools can make your candy-making better:
- Candy thermometer for precise temperature control
- Silicone molds for creating uniform candy pieces
- Kitchen scale for accurate ingredient measurements
You probably have most of these tools at home. This means you can start making Rocky Road candy without spending a lot. Just make sure your equipment is clean and dry. This helps your chocolate melt well and your candy set right.
Recipe card
Ready to make the ultimate sweet treat? This printable recipe for Rocky Road candy will guide you through every step. Our instructions are easy, so even beginners can make a dessert that wows everyone.
The Rocky Road ingredients list is your guide for this journey. You’ll learn how to pick the best chocolate and the right mix of nuts and marshmallows. This way, you can turn simple ingredients into a rich treat.
Equipment
- Microwave-safe bowl or saucepan
- Spatula or spoon
- 8×8 inch baking dish
- Parchment paper
- Refrigerator

Ingredients
- 2 cups semi-sweet chocolate chips
- 2 tablespoons butter
- 1 cup mini marshmallows
- 1/2 cup chopped walnuts (or any nuts you like)
- 1/2 cup crushed graham crackers (optional for extra crunch)
Instructions
- Prep your pan: Line an 8×8 inch baking dish with parchment paper. Set aside.
- Melt the chocolate: In a microwave-safe bowl, combine chocolate chips and butter. Microwave in 30-second intervals, stirring each time, until smooth. (Or melt over low heat in a saucepan.)
- Mix-ins: Stir in mini marshmallows, chopped nuts, and crushed graham crackers (if using).
- Assemble: Pour the mixture into your prepared dish. Spread evenly.
- Chill: Refrigerate for at least 1 hour or until firm.
- Cut & Serve: Once set, lift out using parchment, cut into squares, and enjoy
Expert Candy Layering Techniques
Layering turns simple ingredients into a stunning dessert. Start with a thin chocolate base. Then, place marshmallows and nuts for texture and flavor.
- Pour melted chocolate into a lined baking pan.
- Sprinkle marshmallows evenly across the surface.
- Add chopped nuts for crunch.
- Drizzle remaining chocolate to cover toppings.
Homemade Candy Storage Secrets
Proper storage keeps your Rocky Road fresh. Store in an airtight container at room temperature for up to a week. Or refrigerate for longer.
“The key to great candy is not just in the making, but in the keeping.” – Artisan Chocolate Maker
Refrigeration tip: Use wax paper between layers to prevent sticking and keep the candy’s texture perfect.
Conclusion
Making this easy dessert recipe is more than just a tasty treat. It’s a simple yet magical homemade gift idea. It turns basic ingredients into something truly special.
This chocolate lovers treat is incredibly versatile. You can make it your own by trying different ingredients. It’s a fun way to personalize your creations.
- Customize your mix with favorite nuts
- Explore unique chocolate combinations
- Create memorable gifts for friends and family
What makes this recipe stand out is how easy it is. Anyone can master Rocky Road Candy, no matter their baking skills. It’s simple to make and packed with flavor.
Baking is about sharing love through food, and Rocky Road Candy does exactly that!
Don’t be afraid to get creative. Each batch is a story of your personal touch and culinary adventure. Whether it’s for yourself or a thoughtful gift, it’s sure to bring smiles.
So, grab your ingredients and start making memories. Become your own chocolatier, one sweet bite at a time!
FAQ
How long does Rocky Road Candy take to make?
It takes about 15-20 minutes to prepare. Then, it needs 2-3 hours in the fridge to set. It’s a simple dessert that’s quick to make.
Can I use different types of chocolate for this recipe?
Yes! Try milk chocolate, dark chocolate, or semi-sweet chocolate. Each will change the flavor of your Rocky Road Candy.
Are there nut-free alternatives for this recipe?
Yes! For those with nut allergies, use sunflower or pumpkin seeds. Or add more marshmallows or dried fruits for crunch.
How long can I store Rocky Road Candy?
Store it in an airtight container in the fridge for up to 2 weeks. Keep it chilled and covered for the best taste and texture.
Can I make Rocky Road Candy ahead of time?
Definitely! It’s a great choice for parties, holidays, or gifts. Prepare it 1-2 days before serving.
What’s the best way to cut Rocky Road Candy?
Use a sharp knife warmed in hot water and dried. This prevents cracking. Let it soften slightly before cutting for neater pieces.

Rocky Road Candy
Ingredients
Equipment
Method
- Prep your pan: Line an 8x8 inch baking dish with parchment paper. Set aside.
- Melt the chocolate: In a microwave-safe bowl, combine chocolate chips and butter. Microwave in 30-second intervals, stirring each time, until smooth. (Or melt over low heat in a saucepan.)
- Mix-ins: Stir in mini marshmallows, chopped nuts, and crushed graham crackers (if using).
- Assemble: Pour the mixture into your prepared dish. Spread evenly.
- Chill: Refrigerate for at least 1 hour or until firm.
- Cut & Serve: Once set, lift out using parchment, cut into squares, and enjoy